Search This Blog

Followers

Friday, December 28, 2018

Jane's attic update No XXXVIII: a hanging lamp.

Today I bought this cute little pink hanging lamp for Jane's attic... Oh-ho, wait a second, did you say.... pink? Yes, I did. And to prove it, here's a picture!


BUT.................... that was only the beginning! The lamp was in for a treat, a transformation 'Rust & Steel' style! The hands of time threw themselves on the unsuspecting lamp, like a predator on its prey, resulting in a complete makeover! 
Below are is a pictorial account of the result. Now that is a lamp I want to use for the attic!


You didn't really think that I would use a pink hanging lamp, now did you...?

Thanks for visiting and see you next time!

© José Pereira Torrejón. All rights reserved. No part of the content of this blog may be distributed, published or reproduced without prior authorization from the author.

Jane's attic update XXXVII (b): an extra piece of furniture for the dolls house.

After I published my latest update on the miniature dolls house for Jane's attic, I decided to add another one. Not only to fill up the empty space a bit, but also simply because it had been such a joy to create the small bed, that I felt like doing another miniature in the same scale.


So I did a two door wardrobe and placed it in the same floor as the bed. I had to be careful where exactly to place it, because of the layout of the facade of the house, and the place where the inner wall would be located, had I decided to use it. In other words, sometimes one has to take into consideration things that are not there, as if they were!


If anything, this exercise has enthused me to try building a few more dolls houses in this scale, only now totally built from scratch, without the aid of a kit.

Let's see how things go, but now Good Night and Good Luck! 

© José Pereira Torrejón. All rights reserved. No part of the content of this blog may be distributed, published or reproduced without prior authorization from the author.

Thursday, December 27, 2018

Jane's attic update XXXVII: the dolls house.

Hi everybody, I hope you're doing great!

I've been working on a miniature dolls house which I'm sure will fit just right in Jane's attic! It was built from a laser cut kit which I bought at a fair recently, although no doubt the end result turned out somewhat different than intended by its designer!


The kit was very basic, so I decided to do 'something' with it to make it more suitable for the attic. I built the basic structure, i.e. the outer walls and roof, but then, discarding the building instructions, I started to add extra stuff to it. This include wooden beams to support the floors, an extra layer to the inner walls to which then wallpaper was applied, and subsequently weathered and shredded to pieces, and wooden (actually cardboard) flooring.


I also decided to leave out the upper floor and inner wall out altogether, as well as the front of the house. After all, this is supposed to be an old, derelict dolls house stuck away in an attic. It was not supposed to look 'pretty' or complete,  but rather like something that has been played with a lot, showing the wear and tear of heavy use and subsequent abandonment. I did, however, work on the missing floor and inner wall, and put them next to the house, much like people usually do when they store something together with its bits and pieces, to (maybe) restore it some time in the future.


As you can see on these images, I also placed supporting beams where the second floor is supposed to be, even though the floor itself was left out. I did this to add more realism to the structure.


The above and below images show the upper floor and inner wall of the house, leaning against it.


The above photo gives you an idea of the size of the dolls house, which is 8 cm tall, 5 cm wide, and 2,5 cm deep (3,1 x 1,9 x 0,98 inches). 

After all was done, I thought that it would be nice to install a tiny, bare light bulb hanging directly below the roof, just to add some extra 'magic' to it all.


Then I decided to actually add a piece of furniture to it, a bed. It had to be extremely tiny though, so it was quite a challenge (remember the big hands?), but in the end I managed to do something that looks pretty convincing, I must say. Here are some pictures..


I'm very pleased with the outcome of this little project, and for sure the 'creepy dolls house' will be a great addition to Jane's attic!!


Thanks for visiting, and see you next time!

© José Pereira Torrejón. All rights reserved. No part of the content of this blog may be distributed, published or reproduced without prior authorization from the author.

Tuesday, December 25, 2018

The Broken Child


The Broken Child

"Mom, my friend told me that
he doesn't believe in Santa anymore."
"Really? That's a pity, you see,
Santa will never stop believing
in him." 

JPT

© José Pereira Torrejón. All rights reserved. No part of the content of this blog may be distributed, published or reproduced without prior authorization from the author.

Sunday, December 16, 2018

Jane's attic, update XXXVI: the staircase to the attic.

Hi Everybody!

Today I'm discussing quite a 'big' project I've been working on: the staircase that leads to Jane's attic.


Considering that the attic is a 'stand alone' project of sorts, with no rooms underneath it, at least for now, adding a staircase seems rather redundant. I could have settled for a much more simple solution, like leaving it staircase out altogether. But, as always, I don't like to opt for 'shortcuts', preferring instead to invest time and effort in something that may not even be seen. So I went for the stairs, and to be honest, I'm pretty sure I'll end up using them in attic photo shoots and stories anyway!


The first thing I got my hands on was the banister at the top of the stairs. Since I wanted the posts to be stuck firmly to the floor, I glued wooden slats around the opening of the staircase, then drilled holes to stick the posts in and glued them as well.


The main posts got extra attention as well, to ensure a sturdier adhesion to the floor. To this end, I drilled holes in the floor and placed pins underneath them.


The below two images show the end result. Note that the railing was painted in two colors to give it that extra 'touch'.


Now, the banister was the relatively 'easy' part of the project. Once completed, the next step was to start working on the stairs. I had never done anything like it, so it was a lot of trial and error involved. Below is how the stairs looked originally.


I glued the parts together, applied some layers of English wax to them, and went on to attach the rods that would hold the stair tapestry in place, then weathered them.


Those rods were a bit of a pain in the eye to do, and quite time consuming. But, as is always the case when one finally completes such a tedious task, the results make one feel like it was totally worth the effort!


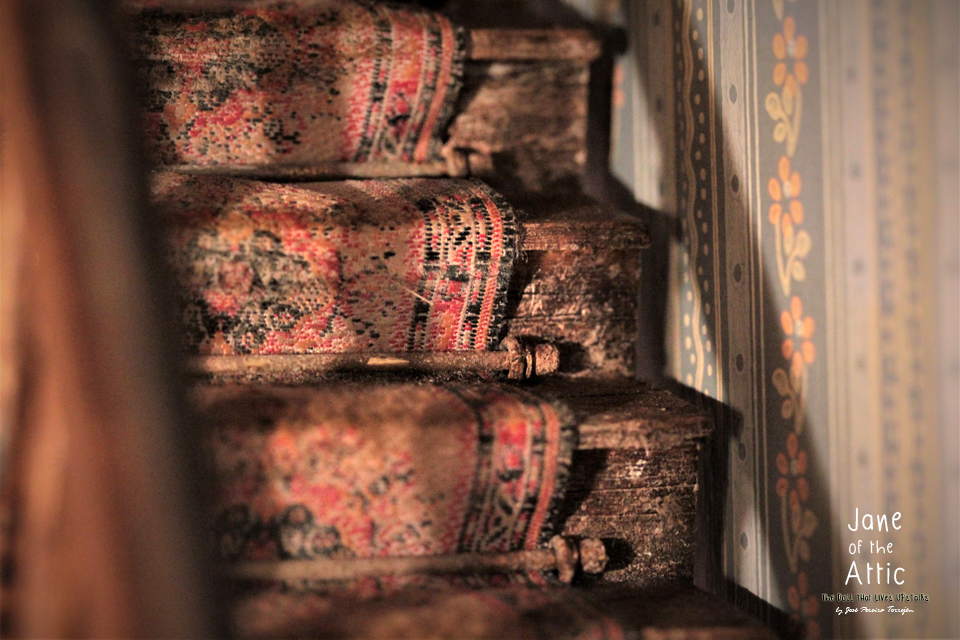
The tapestry was subsequently applied. Note that there was no glue used in the process. The carpet was carefully slid under the rods that keep it in place. This gives the stairs a more genuine appearance, as the carpet looks somewhat 'loose' here and there, which it actually is!


Then came the placing of the posts, and the weathering of the carpet, which for me is the part that is most fun! Below is a selection of images showing the final result.


All things considered, this project turned out pretty well. It was a hell of a job to do, but the result is quite satisfactory. I mean, wow, I completed my first staircase!


A big thanks goes to Rebecca Micallef again, for guiding me through the process with her invaluable help and advice!


Thanks for visiting, and see you next time!

© José Pereira Torrejón. All rights reserved. No part of the content of this blog may be distributed, published or reproduced without prior authorization from the author.