Search This Blog

Followers

Showing posts with label Jane's attic project. Show all posts

Thursday, March 7, 2019

Jane's attic update No LII: attaching frames to the walls.

Jane's attic holds many old portraits and enigmatic paintings hanging from its aging walls, sitting on the dusty floor, or the dilapidated sofa! These are interesting enough to be reviewed in a separate blog, but the purpose of this one is to discuss the way they are attached to the attic walls.


Most dolls house builders use some sort of adhesive wax or paste to fix frames to walls. That is a quick and effective way of doing things, and what's more, the paste is more or less removable. However, despite the advantages, this is not my preferred method. For starters, I like to work on the back of the frames as much as on the front, even though the back is hidden from view for obvious reasons. I don't mind that the extra details will become invisible; to me it's enough to know that they're there! Hence, if I put so much effort in making a frame look like a frame, then hanging it like one comes only naturally!


I feel that hanging the frames on the walls in the same way real ones are done, adds that extra bit of realism to my work. To achieve this, I attach a metal cord or loop to the back of the frame, and hang it from a metal hook stuck into the wall. By doing this, the upper part of the frame comes a bit off the wall, adding depth, specially when shadows and lights come into play. This is something that cannot be achieved by fixing the frames with adhesive paste (ok, it can be done, but it looks very ugly!). True, it's a lot of additional work, but I think the result is worth the effort!


* * *


Thanks for visiting, and see you next time!

© José Pereira Torrejón. All rights reserved. No part of the content of this blog may be distributed, published or reproduced without prior authorization from the author.
Friday, February 1, 2019

Jane's attic update No XLVII: Another sneak preview.


Hi All,

Here's another update for Jane's attic: a picture showing part of the room with the staircase. This is a little room next to the main attic room. It is here where the chilling spectre of a woman dressed in a wedding gown can often be seen...


"The dead will not lie still,
And things throw light
On things."
Theodore Roethke, American poet (1908-1963)

* * *

Thanks for visiting, and see you next time!

© José Pereira Torrejón. All rights reserved. No part of the content of this blog may be distributed, published or reproduced without prior authorization from the author.

Thursday, January 24, 2019

Jane's attic update No XLIV: an old wooden crate.

Hi All,


Today I'm presenting you with another finished item for Jane's attic: a beautiful, old  wooden crate full of books and papers.


The crate didn't look anything like this when I  bought it; in fact it was quite simple and unpainted. So... I basically trashed it, took it apart, weathered it, and put it back together again, but not nicely as it was, but rather rough, to make it look like it had had a long and tumultuous life.


Likewise, the books underwent a similar "José Torrejón" treatment that added years of use to them. I must say that it's not always easy to 'destroy' something nice and new, but it's absolutely necessary in order to achieve the intended effect. In any case, I'm very pleased with the result!


Thanks for visiting and see you next time!

© José Pereira Torrejón. All rights reserved. No part of the content of this blog may be distributed, published or reproduced without prior authorization from the author.

Friday, January 11, 2019

Jane's attic update No XLIII: A rocking horse.

Recently I bought another wonderful miniature from the talented mister Han Goergen, the same artist that created the wheel chair which was posted earlier in this blog. This time, it was a beautiful rocking horse.


Normally I do perform what I would call some 'after sale' work on ready made items, to make them more 'fit' to their intended use. Usually that involves weathering, adding additional parts, or even getting rid of some. That's exactly what I did with the wheel chair. However, mister Goergen's horse was so totally perfect the way it was, that there really wasn't much for me to do on it! For starters, the weathering was just right, so I did zero work on that!


Yet, stubborn as I am, I still wanted to add something to it of my own, even when it wasn't really necessary. And that 'something' was a saddle. 


So I went about creating one, using all kinds of materials. The only parts that are actually miniature saddle parts are the stirrups. The rest, like the seat, saddle blanket and stirrup leathers were created 'on the go', in other words, I improvised. And I must say I'm really happy with how it came out! I do hope that mister Goergen will like this additions to his horse!
And, just in case you wonder: the saddle is not fixed to the horse, so it can easily be removed if need be! 


Above image: the rocking horse was already perfectly weathered, so I left it 'as is'.


Thanks for visiting and see you next time!

© José Pereira Torrejón. All rights reserved. No part of the content of this blog may be distributed, published or reproduced without prior authorization from the author.

Sunday, November 25, 2018

Jane's attic, update XXIX: a stick horse.

Hi everybody! Today I'm discussing another item in Jane's attic: a stick horse that saw a lot of action as the favorite mount of children through many years of joyful play! 


But let us go back to how it all began: a pretty, snowy white stick horse, looking fresh out of the factory! Below are two images showing the stick horse in its original condition.


Yet, years of playing have changed the little horse. He got weathered, and, if viewed in a certain light, he even looks a little bit... spooky. But that's OK, because the invisible hands of time have given him more 'character', I even dare to say an individuality that he didn't have before. Even the camera loves him so much more now! Besides, the children still play with him, at night, in the old attic...


Thanks for visiting, and see you next time!

© José Pereira Torrejón. All rights reserved. No part of the content of this blog may be distributed, published or reproduced without prior authorization from the author.

Thursday, November 22, 2018

Jane's attic, update XXVII: a well-worn chair.

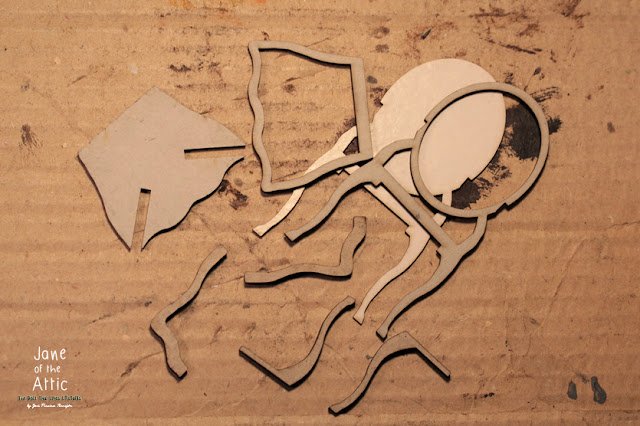
Today I'm sharing another finished small project, this time a 'Louis Something' chair that came as a laser cut kit from Melissa's Miniwereld, and which will find a place to live in Jane's attic. The below image shows the kit after unpacking.


I must say I like Melissa's kits, and after having bought several of them I already became familiar with their distinctive, sweet aroma of burned cardboard, that greets you as soon as you open the package. It ranks high on the list of my favorite aroma's, together with petrol, coffee, burned rubber, and a few others that I really cannot discuss here.


Anyway, the kit was easily assembled, although it took me some time to digest the written instructions, but that's just me being more acquainted with Ikea and Kinder Bueno Surprise egg assembly manuals. The above pic shows the assembled chair, minus the upholstery and painting, which is at one's own discretion. Of course at this point I could have chosen to leave the chair looking like the seat of an old German war plane, but that would be too easy. So I decided to work on it, making it look very nice first, then ravishing it completely to make it suitable for the attic.


And here is the end result! I must admit that the backrest looks as if the chair was used by someone carrying a chainsaw on his back, but I guess that's the beauty of it. You may also note that one of the front legs seems to be a half millimeter shorter than the rest, but any wobbling can be easily solved using a miniature beer mat! In any case, I do hope that you like it!


Thanks for visiting, and see you next time!

© José Pereira Torrejón. All rights reserved. No part of the content of this blog may be distributed, published or reproduced without prior authorization from the author.

Monday, November 19, 2018

Jane's attic, update XXVI: a phonograph.

For the past few days I've been working on a white metal kit of an early Edison phonograph for Jane's attic. Below is a picture of the kit before I started putting it together.


The phonograph is a device for mechanical recording and reproduction of sound, which was invented in 1877 by Thomas Edison. His phonograph originally recorded sound onto a tinfoil sheet (later wax) wrapped around a rotating cylinder, or drum barrel.


When it came to choosing the color scheme of the phonograph, I let myself be guided by two criteria, namely: the results of historical research on the subject, and -maybe more pressing-  the wish that the colors to be used should match with the rest of the furniture in the attic. The idea was to allow the phonograph to 'blend' with its surroundings, making it only 'visible' when inspecting the contents of the attic.


Overall, I think the result looks pretty nice. The phonograph got a very convincing 'vintage' look, and it blends very well with the rest of the stuff in the attic. Please scroll down for a pictorial account of the project.


This image: Carrier deck, carriage guide rod, and music cylinder.
This image: close up of the belt driving the music cylinder (drum barrel).
This image: close up of the music cylinder and carriage guide rod.


Thanks for visiting and see you next time!

© José Pereira Torrejón. All rights reserved. No part of the content of this blog may be distributed, published or reproduced without prior authorization from the author.