Search This Blog

Followers

Thursday, July 25, 2019

Rust & Steel: Tri-ang dolls house N0 61 [1937]

Hi everybody, as always, I hope you're doing well!

Today I'm sharing images of my recently acquired vintage Tri-ang dolls house No 61. It's my very first dolls house by the famous English brand, and I'm totally thrilled with it!


The house is very, very old; in fact this particular model is an improved, 1937 version of the original model which started production in 1932, making this lady at least 80 years old! Needless to say that it shows its age, which is exactly why I love it so much! It looks like a time traveler from another era, another world actually, when one realizes all the events that took place around us since the house was built, and how different the world looked back then!

This blog will show you 'No 61' in exquisite detail, so sit back, relax, and enjoy!


Above image: the house shortly after arrival, sitting in my workshop. Note the unusually large horse shoe above the front windows. Traces of two smaller ones could also be found above the garage door and the porch, but those were long since gone. And although I usually don't change anything, that big horse shoe had to go too!

You can see the run down state the house is in: the paper covering the roof is peeling off, the wood shows cracks, and one of the garage doors is bended, probably due to storage in moist or damp conditions. In sum: she looks like a dream to me!


The above image shows the horse shoe already removed. But instead of trying to erase all traces of its existence, I kept the ghostly impression it left on the wall, like a scar of sorts (below image).


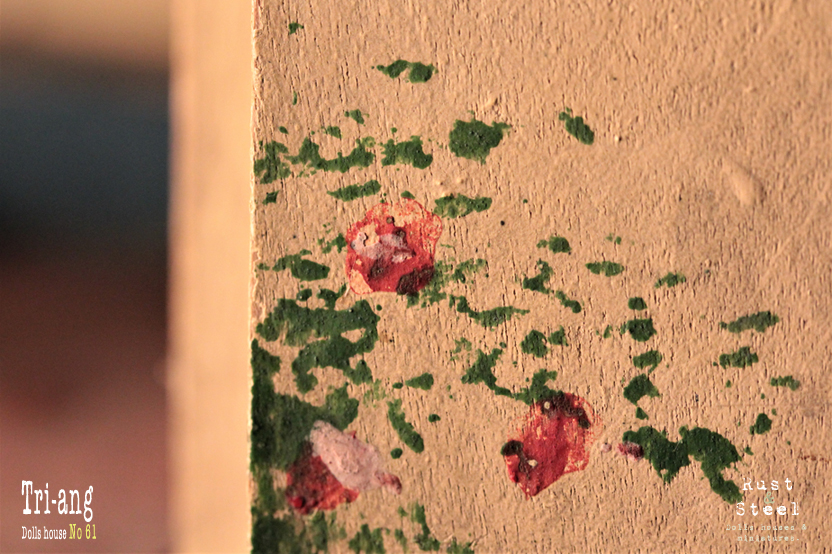
Above image: the porch to the left of the house. Below: a close-up of the rose bush painted on the front. As you can see this was done by hand, so no two were the same. It does look very pretty!


Above and below:  a study of the window box which was added in 1937 as an improvement to the original, 1932 version of the house. This addition is mentioned in the catalogue, a caption of which you can see at the bottom of this blog.


Above and below: the blue garage doors showing their age. As you can see, the dolls house is finished rather 'crudely', compared to today's standards. I guess one of the reasons for that, is the fact that they needed to be tough and safe for children to play with. Today's dolls house builders target a different audience, namely adult collectors, who deal with them in a very different way. It's also worth mentioning that each dolls house is unique, as it was hand made. These houses were quite expensive too. So much so, that they would be prohibitive for most families back then.


Above: close-up of the garage door knob and door hinge. Below: the window box at the front of the house, seen from the inside. Note the clips securing the metal windows to the wooden wall frame.


Above and below: a sneak peek inside the house, showing the decrepit floral wallpaper and a light bulb.


Below: the house misses the original hook that secured the hinged front to the main structure. A make shift replacement hook using a piece of metal wire was made at some point in time, which is pictured here. My intention is to replace it with a fitting hook.


Above and below: the paper covering the roof suffered with the passing of time, making it look a bit like dried skin. But this makes the house the more beautiful and interesting!


Above: the Tri-ang paper certificate underneath the dolls house. Below: the battery holder shows some slight signs of corrosion...


Above: a fine study of the beautifully shaped roof of 'No 61'. Looking at it, I realize how lucky I am to have found this little treasure!

Above: concluding this tour, here's an 'artistic impression' of House No 61 in the 1937 catalog, that at the time still mentioned the name L. B. Ltd (Lines Brothers Ltd). They were the founders of the company that later became known under the brand name Tri-ang.
* * *
Thanks for visiting, and see you next time!

© José Pereira Torrejón. All rights reserved. No part of the content of this blog may be distributed, published or reproduced without prior authorization from the author.

Monday, July 22, 2019

Rust & Steel miniatures: an old, Tri-ang Minic clockwork truck.

Hi all, I hope you're doing well!!

Today I did a small photo shoot of an old, Tri-ang Minic clockwork truck which I recently acquired. I thought it would be nice to park it inside the garage of a beautiful 1930s dolls house which keeps me company here in my workshop.


The above image is the same as the first one, but edited with various filters to make the spiders web above the truck more clearly visible to you. That spiders web is totally authentic, and came with the house, although the spider who made it has longe since moved out (I guess).


The truck fits in very well, and looks as if it has been there for ages... I don't know if the scale is correct, but honestly I don't care; I just like it the way it is!
The left door of the garage is broken in half, and the broken piece was missing when I got the dolls house. But that is OK with me too!


The above image shows a little bit of the front of the dolls house. The paper with brick pattern that covers the wood has loosened and cracked open with age... just perfect, if you ask me!!


More images and close-ups of the truck. Here you can see the rust on its grill and bumper. The skills of Father Time in terms of weathering objects are an inspiration to me. He is my benchmark and teacher when it comes to weathering, and I hope that one day I'll become as good as he is!


I hope you liked the photo's! I'm sure I'll dedicate a blog to the dolls house itself at some point in the future, but for now, thanks for visiting, and see you next time!
* * *

© José Pereira Torrejón. All rights reserved. No part of the content of this blog may be distributed, published or reproduced without prior authorization from the author.

Wednesday, July 17, 2019

Rust and Steel Miniatures: an ancient room box.

Hi all, I hope you're well!

Today I received an antique room box which I totally love! The thing is very old, run down, weathered, and looking the worse for wear; in other words: perfect!!!!

Needless to say that I won't change a thing; I'll leave it as it is, including the cracks in the walls and stains on the ceiling.

I borrowed the bed which I made for the Metamorphosis project, and placed it in one of the rooms (it has two), then took some pics, one of which is shown here. Now... can you already smell the scent of old wood, and enjoy the beauty of decay..?


* * *
Thanks for visiting, and see you next time!

© José Pereira Torrejón. All rights reserved. No part of the content of this blog may be distributed, published or reproduced without prior authorization from the author.

Monday, July 15, 2019

The "Metamorphosis" project: pillow talk (sort of).

Hi all, I hope you're doing well! A fresh week has started, so let's make the best of it!

Today I want to touch base on the degree of realism that one wants to put into miniatures when creating them.

Of course this varies greatly across our 'miniaturists community' for reasons too numerous to contemplate here, ranging from the level of skill the miniaturist has, to the perceived need to create something more or less resembling the original object one wants to portray.

Personally I'm quite pragmatic on the subject, and the level of realism I apply serves the purpose for which I create a mini. My aim is not to recreate 'reality' in every minute detail (although I sometimes truly enjoy doing just that!) but to create a scene that brings about a certain feeling with the viewer.

More often than not, the objects I create are not totally faithful to a certain scale; they do not mimic the details of the full scale object which inspired them, nor are they always perfectly finished. But again, that's not my intent. 
My miniature scenes are more like a canvas, portraying an expression (and impression) of the images I have in my head.


The above pictures show a pillow I made for the Metamorphosis project. Actually, the pillow was already made, but it was filled with some stuff that did not give it a natural look. 

I wanted to make a little dent or impression on it, as if someone had just slept on it, but no matter what I tried, the thing returned to its original shape. So I cut it open and replaced the filling with something more workable, then gave the pillow the shape that I had in mind. I hope you agree with me that it looks pretty realistic. Never mind the bed, this is just the frame (self-made) on which a mattress and bedding will eventually be placed.

So there you go: reality serving a purpose. But then again, I'm a very pragmatic guy.

* * *
Thanks for visiting, and see you next time!

© José Pereira Torrejón. All rights reserved. No part of the content of this blog may be distributed, published or reproduced without prior authorization from the author

Saturday, July 6, 2019

Jane's attic update LV: an old pair of boxed leather gloves.

Hi all, I hope you're well! 

The other day I came across a miniature that I thought would be perfect for Jane's attic. And although the attic project is done, if I see something that fits, I'll just add it to it. So in a way it's an ongoing thing of sorts.


The item I saw was a pair of gloves in a box, and my mind immediately created a mental picture of them in the attic, as a memento of the old lady that once lived there.
But the gloves didn't look as you see them in the above image, in fact they were brand new. So...., you will understand that I had to take care of them..!


This image and the below one show the gloves in their original state. Much too clean for my taste!


And below is a close up of the gloves after my 'treatment', sitting on my hand to give you an idea of their size.


Although I was done with the gloves, I got the uncomfortable feeling that something was still missing, that something extra needed to be added. Somehow the box looked too 'bare' to me, so I decided to add a piece of very thin paper, much like you will normally find in boxes containing shoes, ties, and shirts. The paper was weathered to match with the box and gloves. Below you can see the end result...


Now the box was truly done, and ready to be added to Jane's attic. The below pictures show the box sitting on top of a pile of old, hat boxes there.


* * *
Thanks for visiting, and see you next time!

© José Pereira Torrejón. All rights reserved. No part of the content of this blog may be distributed, published or reproduced without prior authorization from the author.